Cooler weather is upon us, and many of us, including me, treasure those last warm days of the year. As an Art Instructor for a museum that has over 3.5 miles of winding trails, the opportunity to incorporate the natural beauty into lessons is too good to resist. Some of the artists in our exhibition State of the Art share my affinity for nature, creating artworks that represent it, refer it, explore it, even embody it. Noticing the variety of methods used to represent nature in their artwork, I was immediately inspired to create my own method of capturing nature. You can try this method yourself at home. My description here includes steps appropriate for 9 to 12-year-olds. The final lesson is so simple and stunning, I am pleased to share it here.

Flora C. Mace, b. 1949
“Big Violet” (detail)
Botanical, glass, composite, and steel stand
I prepared this lesson for the Homeschool Friday Fun: Scissors series, a three-part class connecting local homeschoolers with the Museum. The series Scissors explored how artists manipulate different tools to create art. In this lesson, my goal was to teach my students to create relief prints preserving the detail of nature, inspired by the artist Flora C. Mace whose works Big Violet, Tazetta Narcissus, and Fritillaria Checkered Lily are featured in State of the Art. While Mace laboriously deconstructs plants then reconstructs them piece-by-piece into layersof hot glass, my students were tasked to capture the detail of the chosen leaves by strategically pressing them into clay. After cutting the leaf-shape free and manipulating the form to look “natural,” the dried leaves were colored with metallic colored pencils. The results were veiny, jewel-toned sculptures of nature. This lesson is simple enough to introduce to younger ages, but beautiful and versatile enough to inspire any age. Choose air dry or bake clay that will render fine detail, find pliable, textured samples from nature, and with just a few household objects, you’re ready to create your own natural artworks. Happy Autumn!
Supplies: Air-dry clay (we used Activa Plus Clay in black) Fallen leaves (leaves that are still soft and pliable work best) Clay tools or butter knives Wax paper Rolling pin Small bowls to shape Metallic colored pencils (we used Faber-Castell Red Line Metallic Pencils) Area to dry
 Instructions: We began our lesson on the South Lawn looking for interesting, pliable fallen leaves. After each student collected four or five, we trekked back to Walker Landing and enjoyed the last warm day of Autumn with an outdoor lesson.

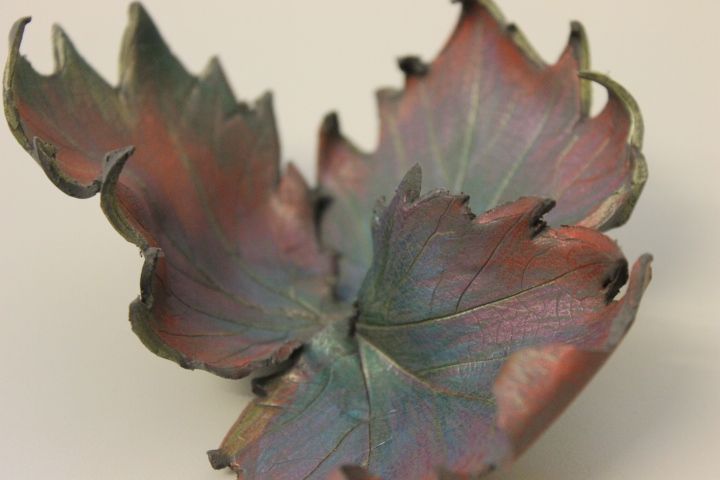
Divide clay up into balls, large and small depending on the size of the found objects. On a sheet of wax paper, flatten the balls out into ¼ inch thick discs using a rolling pin. Press object into clay disc and gently roll the pin across the surface to ensure detail is rendered. Cut around the shape with a clay knife or butter knife. Carefully remove the leaf, and then gently shape the clay leaf into natural shape, or combine a few to create a bowl (I gently pressed the ends of my clay leaves together and let them rest in a small, wax paper-lined bowl to dry in a concave shape). Leave the sculpture to dry for about 24 hours on wax paper. When dry, color the surface with metallic colored pencils. The pencils are fine enough to not overpower the detail of the leaf, while luminous and colorful. See our online calendar for a complete schedule of upcoming classes and events! Moira Traw is an Art Instructor for Crystal Bridges’ Public Programs